How to Create a Discount Card
Create a discount card and configure its discount, design, and customer-facing information.
On this page
Create a Discount card that gives customers a percentage saving and lets them work towards a higher discount as their recorded spending grows. You will set the levels, choose what customers enter when joining, design the card and prepare it for sharing.
Start in your Loyaltymaster business account with access to Cards. Have your offer, participating locations, logo and customer terms ready. The screens below show example settings; choose values that suit your own business. For a complete coffee-shop example, see Grinds: Create a Discount Card.
Decide what the discount covers
Before opening the editor, decide which purchases qualify, the starting discount and the spending needed for each higher level. A level is a named discount rate that a customer qualifies for.
Check that you can afford the highest discount on the products included. For example, a 10% discount on a $20 eligible purchase saves the customer $2, leaving $18 to pay. This is a reduction in the bill, not a $2 cashback balance or two reward points.
Write down any exclusions, whether offers can be combined, and how staff should handle returns. Keep the same rules in the card, your promotions and staff instructions.
Start your Discount card
- Open Cards from the left menu. Start a new card and choose From scratch. You can also start with a suitable template and replace its example settings.
- Give the card a name that you will recognise in your card list.
- In Card type, choose Discount, then select Continue to open Settings.
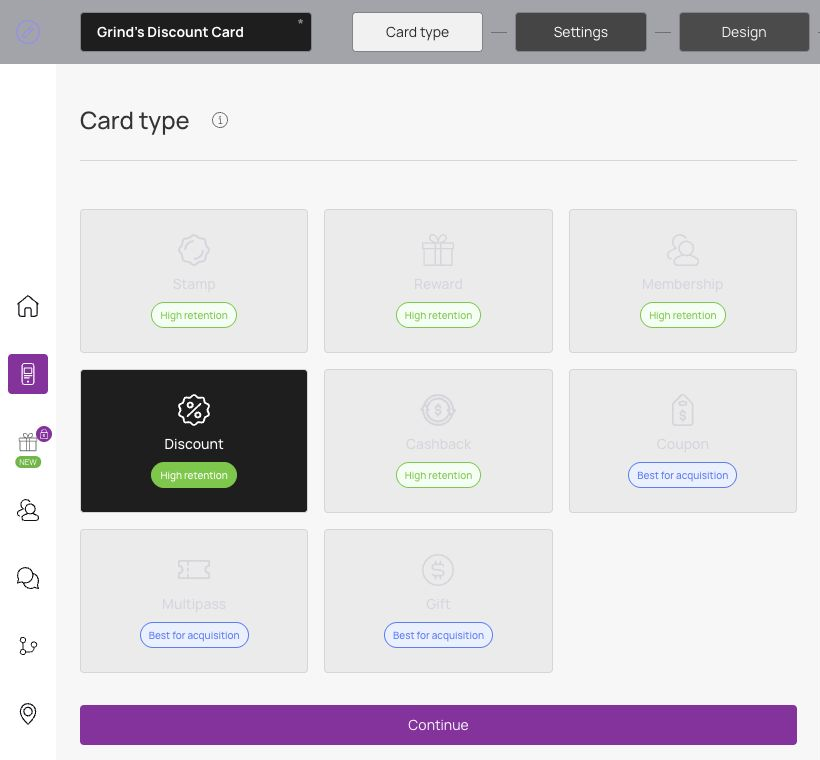
Work through Settings, Design and Information before saving and activating. If you are editing an existing card, its card type may already be fixed.
Set the discount levels
In Settings, find Cardholder status. Each row defines one level:
| Field | What to enter | Example |
|---|---|---|
| Tier name | A name that makes the benefit clear. | 5% Discount |
| Spend to achieve | The recorded spending needed to reach this level. | 250 |
| Percentage % | The percentage discount for the level. | 5 |
Set the starting row first. Its spending threshold is 0; choose the discount a new customer should receive. Add the next levels with Add tier, using increasing spending thresholds. Use the trash icon beside a row to remove an unwanted level before launch.
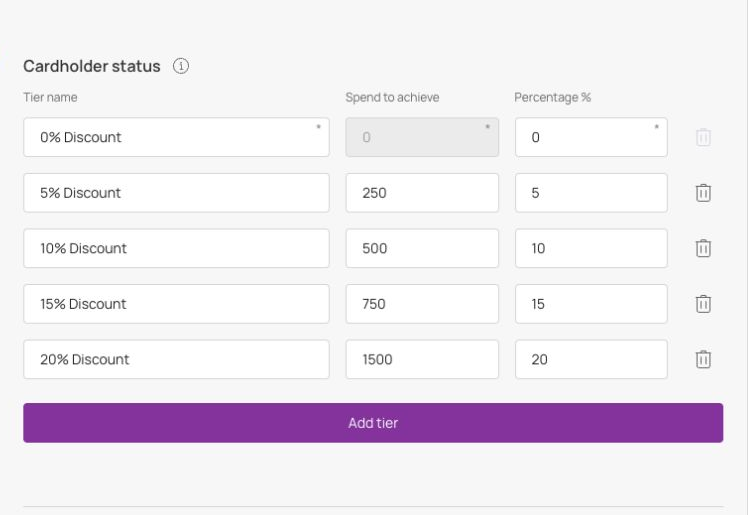
This example starts at 0%, then offers 5% at 250, 10% at 500, 15% at 750 and 20% at 1500. These are example choices, not suggested rates for every business. Use the same currency and definition of eligible spending throughout your offer.
Choose where and how long the card works
Add your business locations through Locations in the left menu, then select the participating locations under Locations in the card's Settings. You can include more than one branch. Choose each location where staff will honour the offer.
Choose the appropriate Card expiration date option:
- Unlimited: use this when your offer has no card expiry date.
- Fixed term: choose one expiry date for everyone, such as 31 December. A customer who joins in November and one who joins in December have the same end date.
- Fixed term after card issuing: choose how many days, months or years each card lasts from its issue date. For example, a six-month term gives each new customer six months, regardless of when they join. Complete the term fields and state that period in your terms.
Choose your customers' language from Language, then check the card in Apple Wallet or Google Wallet. Use a language offered in the list, and write your own offer and terms in the language your customers understand. Check Date format, Thousands Separator and Decimal Separator too. These affect how customers read dates and amounts. For example, a comma decimal separator can display 250 as 250,00.
Under Barcode type, choose the format your staff will scan. The example uses QR Code; PDF417 is also available. The barcode on an installed customer card identifies that card for staff. It is different from the installation QR code you share to help people join.
Add happy-hour periods (optional)
Under Happy hours, set the Multiplier, From and Till times, and the days for that period. Select Add to include another period. You can offer different periods, such as a weekday afternoon and a weekend morning, rather than fitting every offer into one schedule.
Define the offer before enabling it and check how the multiplier affects your discount programme. Keep its terms separate from the normal tier percentages; do not advertise a multiplied discount rate without checking the result.
Create a promotion (optional)
A promotion can temporarily replace the image in the middle of the customer's card when the promotion starts. Use it for a short offer that existing cardholders can see in their wallet.
- Open Promotions and select Create promotion.
- Enter a Name and Description that explain the offer.
- Under Settings, use Select file to upload the promotion image at 960 × 252 pixels. Put the main offer where it remains readable at card size.
- Set Date from and Date to for the promotion period.
- Set Limit per member for how many times each customer may use the promotion. Set Max global usages for the total number of redemptions across all customers.
For an offer available once to the first 50 customers, enter 1 for Limit per member and 50 for Max global usages. A per-member limit of 2 allows repeat use: 50 total redemptions would then not necessarily mean 50 different customers.
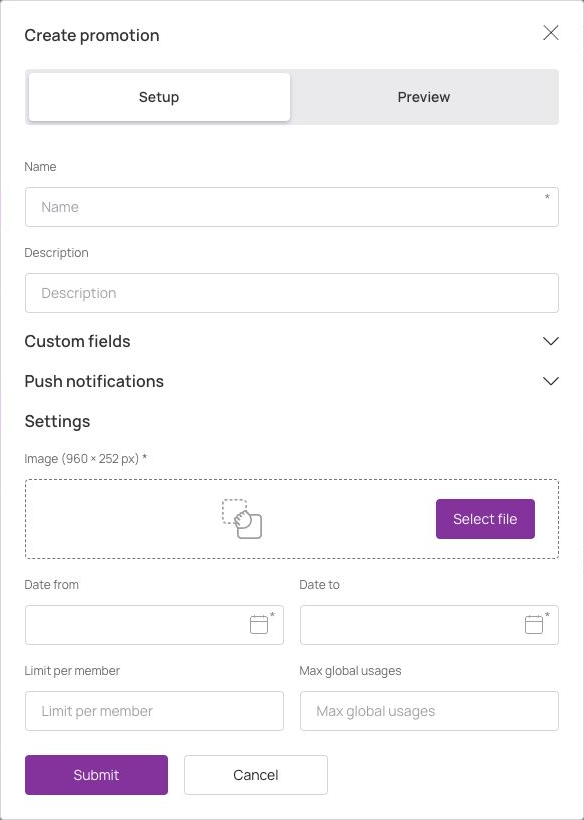
Open Custom fields to choose the promotion details displayed, such as Promotion name, Remaining usages, Promotion start date, Promotion end date or Custom text. Use these to make the offer and its availability clear.
Add promotion messages and preview
Open Push notifications in the promotion dialog. You can prepare a message for the start and a follow-up for the end of the promotion. For each message, choose its date, edit the message text and turn on Active when you want to use it. For example: Your weekend offer is now on your card. Open it for details. Make an end reminder agree with the actual expiry date.
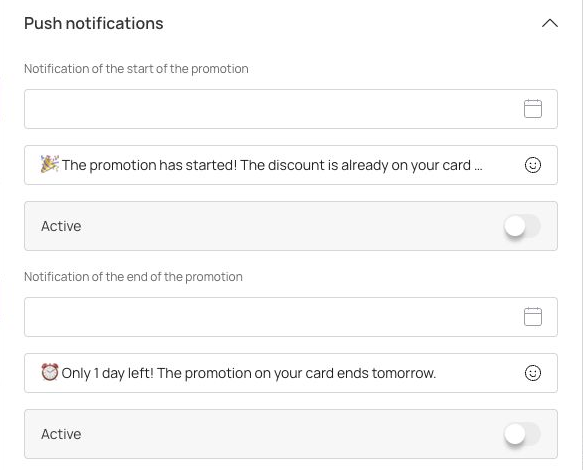
After uploading the artwork and completing the details, select Preview. Check the image, customer-facing fields, dates and limits. Select Submit when the promotion is ready, or Cancel to leave it unsaved. Continue through the card setup and save your changes before launch.
Record purchases and optional comments
For a Discount card whose levels depend on spending, turn on Purchase amount is required in Scanner App under Purchase amount when charging. Staff need to record eligible spending so the customer's progress towards the next discount level can be tracked. Where an amount is already filled in, staff should check it rather than enter it again.
Under Comment when accruing, turn on Require a comment when crediting if each transaction needs a note, such as an invoice number. Otherwise leave comments optional so staff can add them when useful.
Choose what customers enter when joining
Find Card issuing form in Settings. This is the registration form customers complete before installing their card.
- Choose a Field type, such as First name or Phone. You can also collect an email, URL, date, number, text or photo when your programme needs it. A date can support a birthday offer; a photo may help with a membership-style card.
- Enter the customer-facing label in Field name.
- Turn on Required if customers must complete that field. Turn on Unique when its value should be unique across registrations.
- Use Add field for another field or the trash icon to remove a field you do not need.
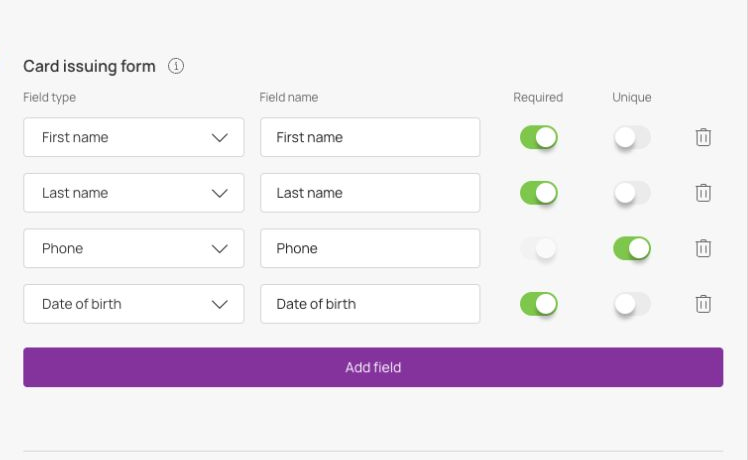
Keep Unique enabled for Phone so different customers do not register with the same phone number. Staff can use this number to find a customer in the Scanner App. Turn on Required as well if every customer must supply it. Other fields can also be unique where needed.
The illustrated form makes the name and birth date required and the phone unique. Choose your own required fields: collect only information you will use, and do not require a birth date or photo unless your offer needs it.
Set Phone mask to your customers' country format, such as United States for US phone numbers.
Review Privacy policy, Consent to the processing of personal data and Privacy policy (full text). Explain what your business collects and why, and provide your privacy-policy link or full wording as appropriate. Check what customers see and must agree to on the joining form.
Choose consent settings that meet the rules applying to your business and customers, including GDPR or POPIA where relevant. Do not treat a preselected switch or box as proof of valid consent. For example, UK GDPR consent requires a clear affirmative action. Have your privacy wording and consent approach checked before collecting customer information.
Offer wallet installation and control issuing
Keep Google Wallet Installation button on so customers with supported Android phones have the Google Wallet option on the installation form. PWA Installation button offers a progressive web app, a web-based alternative for customers who cannot use Apple Wallet or Google Wallet. Enable it if you want to offer that alternative.
Under Limit the number of cards issued, enter a cap such as 200 for a limited programme, or leave 0 for unlimited issuing. This limits cards issued; promotion redemption limits are separate.
Keep Card installation via shared link on when customers should join through a link or QR code you advertise publicly. Turning it off restricts shared-link installation; the editor says individual installation links remain allowed.
Track where customers join (optional)
UTM tags identify the source or campaign behind a joining link. For example, use separate links for a counter poster and a Facebook campaign so you can compare where sign-ups come from. Enter a Source name, complete the Additional fields you need, then select Add a link with a UTM tag. Share the corresponding tagged link in each channel. Use consistent campaign names if you also analyse these links in Google Analytics.
Analytics is where you enter a tracking script supplied for your setup, such as Google Tag Manager. Use the correct script from your analytics account and check that it records the events you need.
If you advertise on Facebook or Instagram, enter your Pixel ID under Meta Ads. This helps connect loyalty sign-ups with your advertising so you can assess campaign results. Check your event and consent setup and verify that a test sign-up appears in your reporting before relying on it to measure returns. Leave tracking fields empty if you are not using them.
Select Continue to move to Design.
Design a card customers recognise
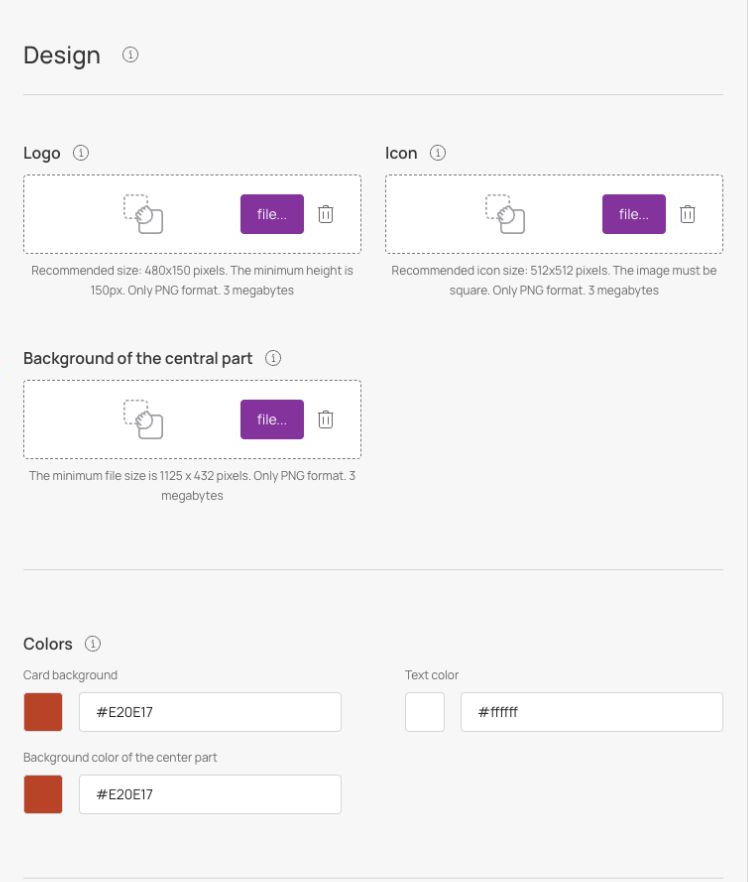
Upload your artwork with the file button in each relevant section:
| Section | What it is for | File guidance shown in the editor |
|---|---|---|
| Logo | Your business logo. | PNG, recommended 480 × 150 pixels, minimum height 150 pixels, up to 3 MB. |
| Icon | A square brand icon, including for notifications. | PNG, recommended 512 × 512 pixels, square, up to 3 MB. |
| Background of the central part | The main artwork across the card. | PNG, minimum 1125 × 432 pixels, up to 3 MB. |
Set Card background, Text color and Background color of the center part under Colors. Use clear contrast so the discount and progress remain readable.
Under Fields name, choose the information to show in each Field dropdown, then enter its visible label in Field name. For example, choose Spend to reach next level and label it To Get to Next Level; choose Discount status and label it Level.
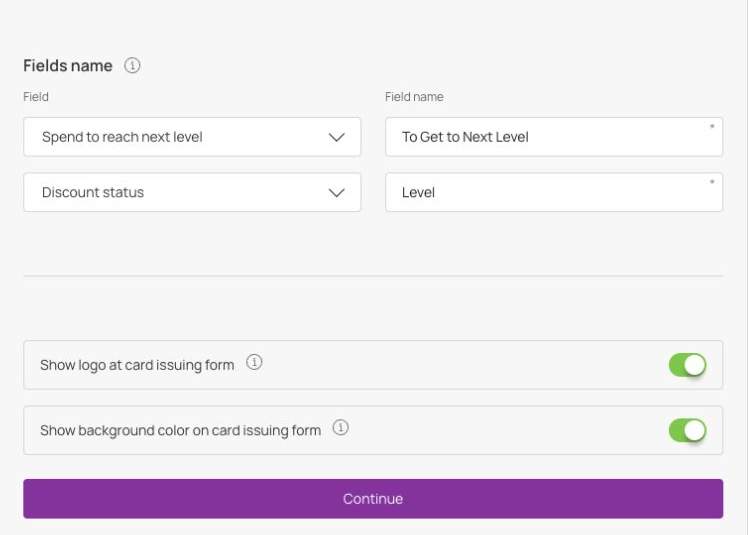
Turn on Show logo at card issuing form and Show background color on card issuing form if you want the joining page to use those brand elements. Check the preview for readable labels and recognisable artwork, then select Continue.
Add information and terms
In Information, enter a short Card description and your Company name. Explain the offer in words your customers will understand, for example: “Build your discount as you spend on eligible purchases.”
Complete the sections that fit your programme:
- Referral program: choose Active only if you intend to offer referrals and have agreed how they work. Otherwise choose Inactive. This choice alone is not a promise of a particular referral reward.
- Active links: choose a Type, enter its destination in Link and give it a useful label in Text, such as
View our menu. Use Add link for more links. Choose the appropriate type for a website, phone number, email or address. - Feedback links: use Add link, choose the service where requested, and enter your business's feedback URL. Check that customers will reach the correct business page.
- Link for redirection after card installation: enter a useful destination if needed. The editor identifies this as an Apple Wallet installation option.
- Terms of use: keep this on and explain the starting discount, thresholds, eligible purchases, exclusions, expiry and return rules. If you turn it off, make sure customers still have a clear way to read your offer terms.
- Link to full terms and conditions: add the address of your full terms if they are hosted separately.
- Issuer information: enter your business's Company name, email and phone number so customers know who issued the card and how to contact you.
Read the terms alongside Cardholder status before finishing. A customer should not see one threshold in the terms and a different threshold on the joining form.
Save, check and activate
- Use Finish when the sections are complete. Save and preview lets you save and review while working. Saving a card and activating it are separate steps.
- Open the saved card's preview or information page. Check the name, discount levels, joining form, artwork, customer links and terms. Use your own installation link or QR code for a controlled check on a phone.
- On iPhone, complete the joining form and follow the Apple Wallet prompt, then tap Add. On Android, use the Google Wallet option when it is enabled. Open the saved card and check that the starting discount and progress are understandable.
- When you are ready to issue the card, choose Activate. Read the warning about settings that will become locked before confirming. If a review screen shows Activate Card, use that activation action there. Return to Cards and check that the card is active.
The editor warns that an inactive template cannot issue more than 10 cards. Complete your checks before promoting the offer widely. For more detail, see Activate a card.
Share the card and prepare staff
Copy the installation link from the saved card's information or preview screen. Use Copy link where shown, or download its QR-code PDF for a counter sign. Customers use that link or QR code to join; staff scan the barcode on the customer's installed card when serving them. See Share a card for sharing options.
Before the first customer uses the offer, show staff which purchases qualify and how to apply the displayed percentage at the till. Do not assume a Scanner App action also changes the bill in your payment system.
Staff should open the customer's card in the Scanner App, check the current discount and record the eligible transaction. On the second confirmation screen, choose the appropriate Add or Redeem action. A comment is normally optional unless your settings require it. Type a purchase amount only when the setup requires it and it has not already been filled in. Follow Scan and make transactions for the shared confirmation flow.
Before launch, use your own authorised test card to check a purchase, the refreshed card and the treatment of a purchase that crosses a threshold. Agree when the higher rate takes effect before telling staff or customers. Do not use a real customer's balance for practice.
Your setup is ready when the card is active, the joining link works, a customer can find the installed card, and staff can explain the current discount and next level. If the form or wallet shows different values, check the tier settings, card field choices and terms before sharing the link again.