How to Create a Reward Card
Create a reward card and work through its reward settings, design, and preview.
On this page
Create a Reward card that lets customers earn points and exchange them for named rewards. You choose how points are earned, what each reward costs and how the card looks in the customer's wallet.
For a coffee-shop offer with four reward levels and Happy hours, follow Grinds Reward Card. This page is the full setup reference.
Before you start, you need an account with access to create or edit cards. Decide which purchases earn points, how many points each reward costs, when points expire and which locations take part. Have your business contact details and customer terms ready. Prepare artwork if you want to add it.
Set the earning rule · Add rewards · Save and test · Counter instructions
The illustrations use Grind's Reward Card to show the available settings. Choose values that suit your business. Some controls are locked on existing cards; configure available choices while creating your own card.
Card type
- Sign in, open Cards, then Create card. Choose a template if it fits your offer, or From scratch to configure your own.
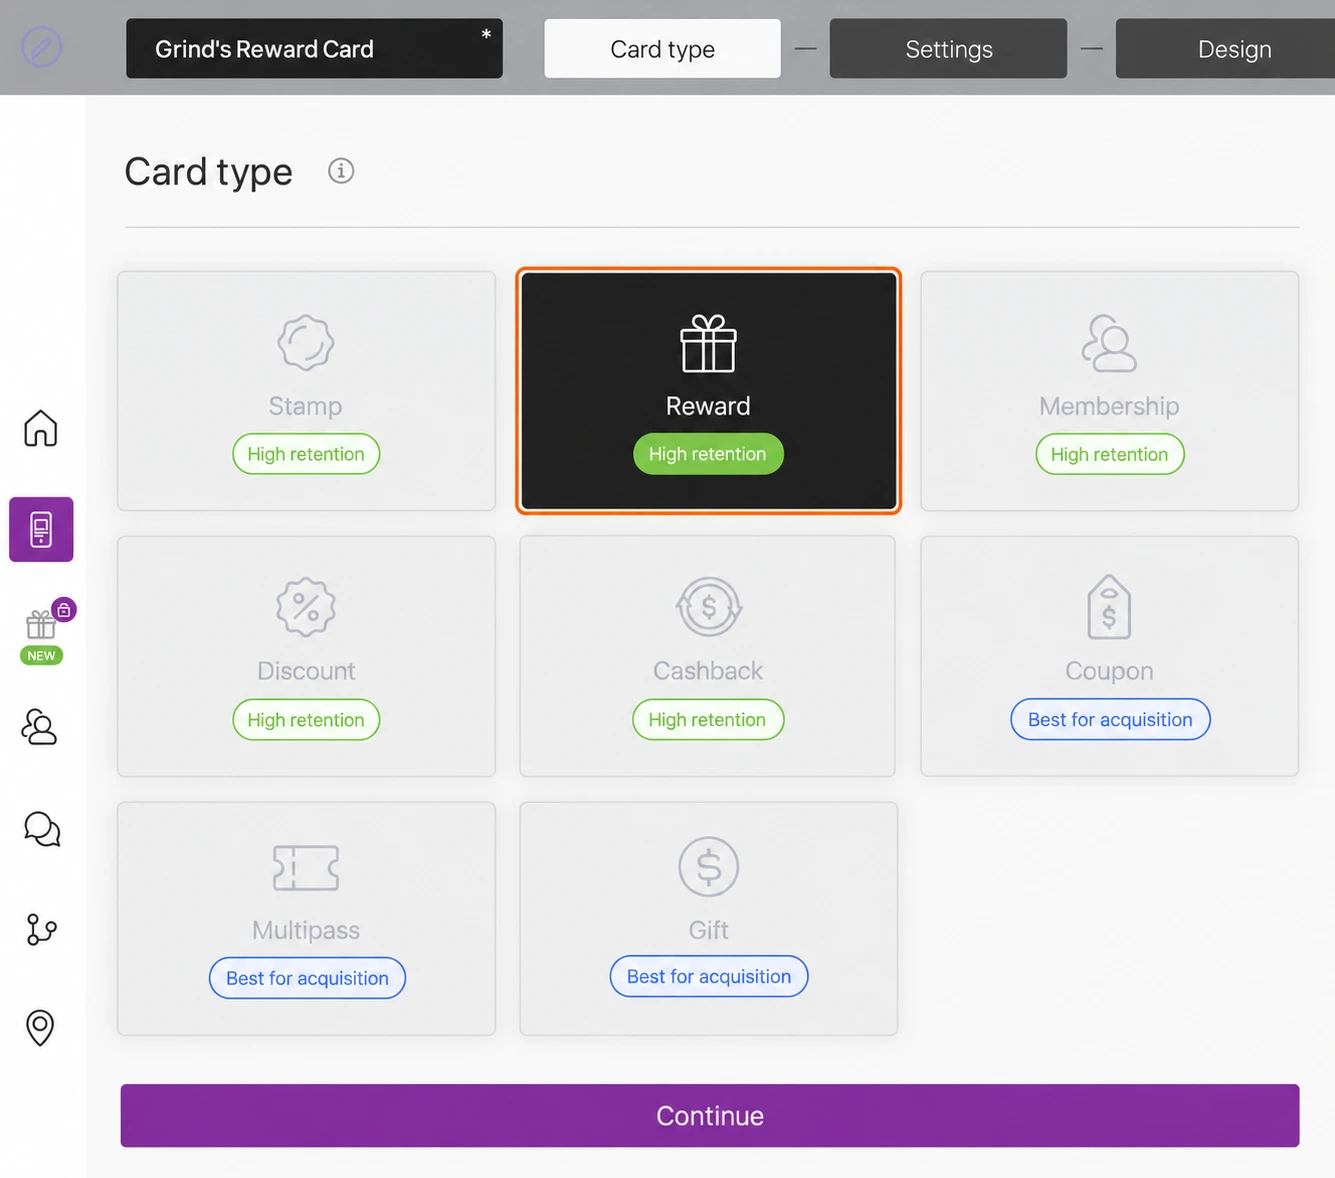
- Enter a card name, select Reward in Card type, then select Continue to open Settings.
Settings
Choose how customers earn points
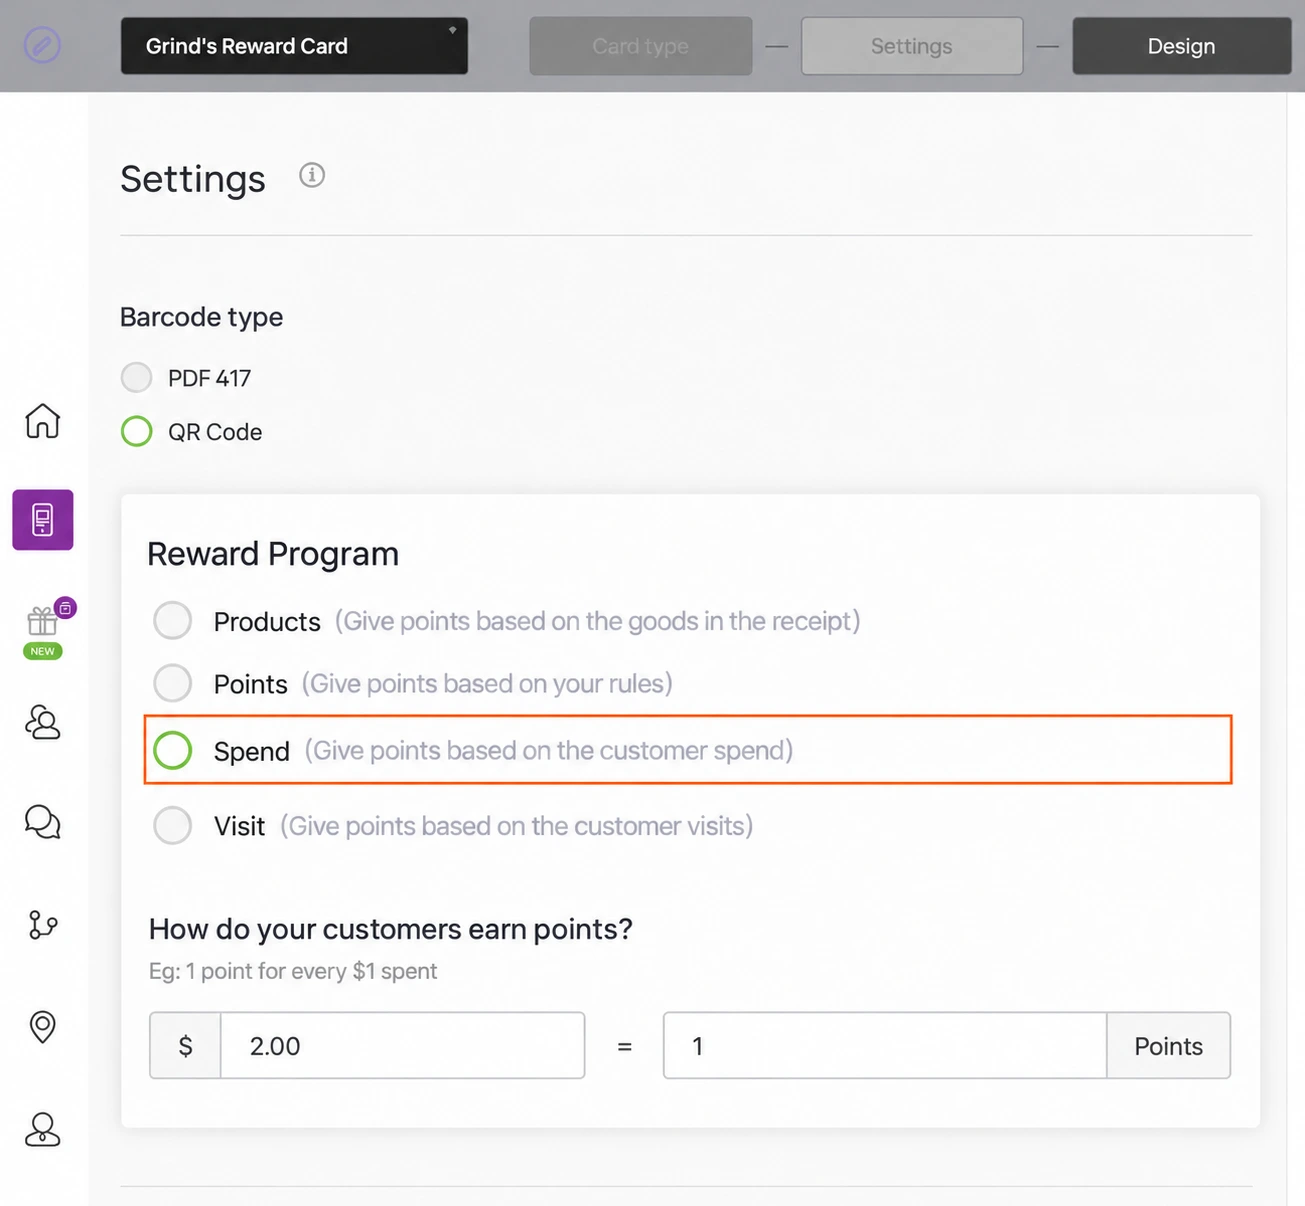
- Choose Barcode type: PDF 417 or QR Code, according to the scanning method your staff will use.
- Under Reward Program, choose the earning method that matches your offer. Agree how staff will record eligible purchases alongside your till process.
| Earning method | What it is based on |
|---|---|
| Products | Goods in the receipt |
| Points | Your own points rules |
| Spend | The amount the customer spends |
| Visit | Customer visits |
- For Spend, complete How do your customers earn points? with the purchase amount and corresponding points. For example, enter
2.00as the purchase amount and1as the points to award 1 point per $2 spent. A $20 eligible purchase therefore represents 10 base points. Confirm fractional-point rounding before promising a result for amounts that do not divide evenly.
Define the rewards and their artwork
- Under How do you want to reward your customers?, enter a Reward level name that tells staff and customers exactly what can be claimed. Set its threshold in Reward points earned.
- Choose Reward type: Custom, Order ($ OFF) or Order (% OFF). Use Custom for a named item or service. For an order discount, complete the amount or percentage fields shown for that choice and check the offer before launch. The example uses Custom for named food and drink rewards.
- Optionally, use the reward's file... button to upload an image for that level. Use PNG, at least 1125 × 432 pixels, within the 3 megabytes limit. A separate image for each reward gives the card a polished appearance and helps customers recognise what they can claim. Keep its wording consistent with the reward name and threshold.
- Review Usage limit, Limit period and Calendar period if you intend to restrict repeat claims. If you want a repeat-claim limit, ask Support how to set the limit and reset period for your offer, including how a value of 0 is handled.
- Use Available only to UTM links, Not available to UTM links, Available only to segments and Not available to segments for targeted rewards. UTM links identify acquisition channels; segments are customer groups. Leave restrictions unselected for an unrestricted starter offer. Confirm precedence if you combine inclusion and exclusion rules.
- Select Add reward for another level. Repeat the name, points and reward type for each level, adding artwork if you want it. Use the relevant trash icon only when you intend to remove an item. Check every remaining level before saving.
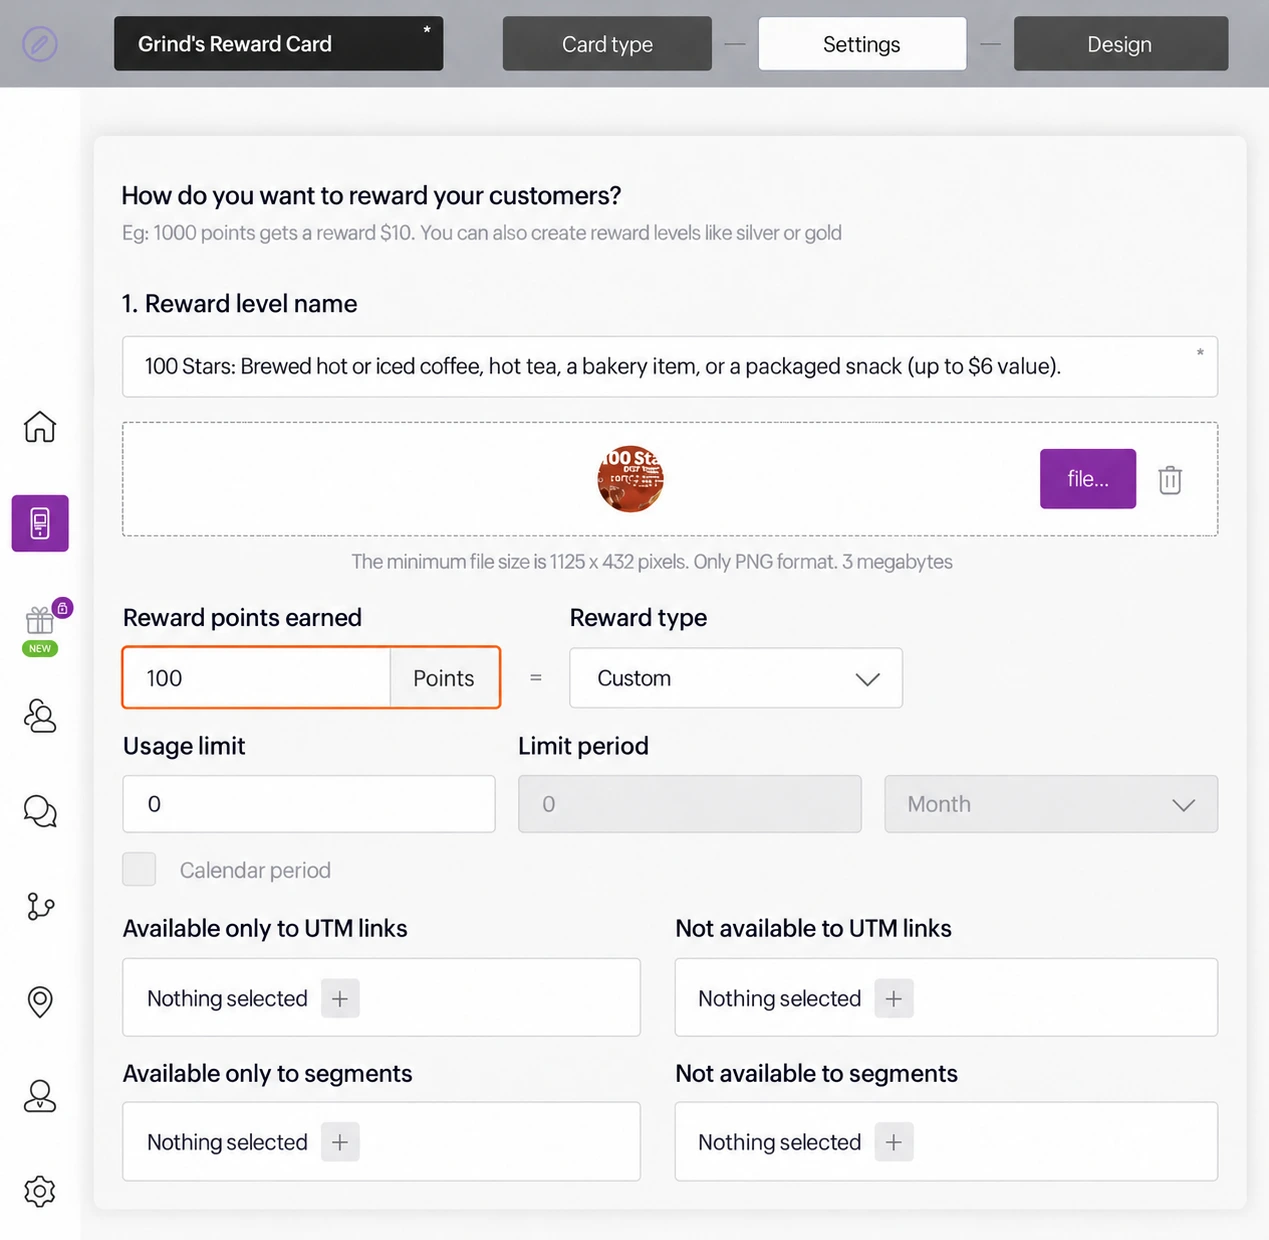
When a customer's balance reaches a reward level, the central image on their phone changes to that level's artwork. For example, you could show a coffee reward at 100 stars, breakfast at 200 and lunch at 300. The Grinds example shows how four different images help customers see what they can claim or save towards.
Add Happy hours or promotions
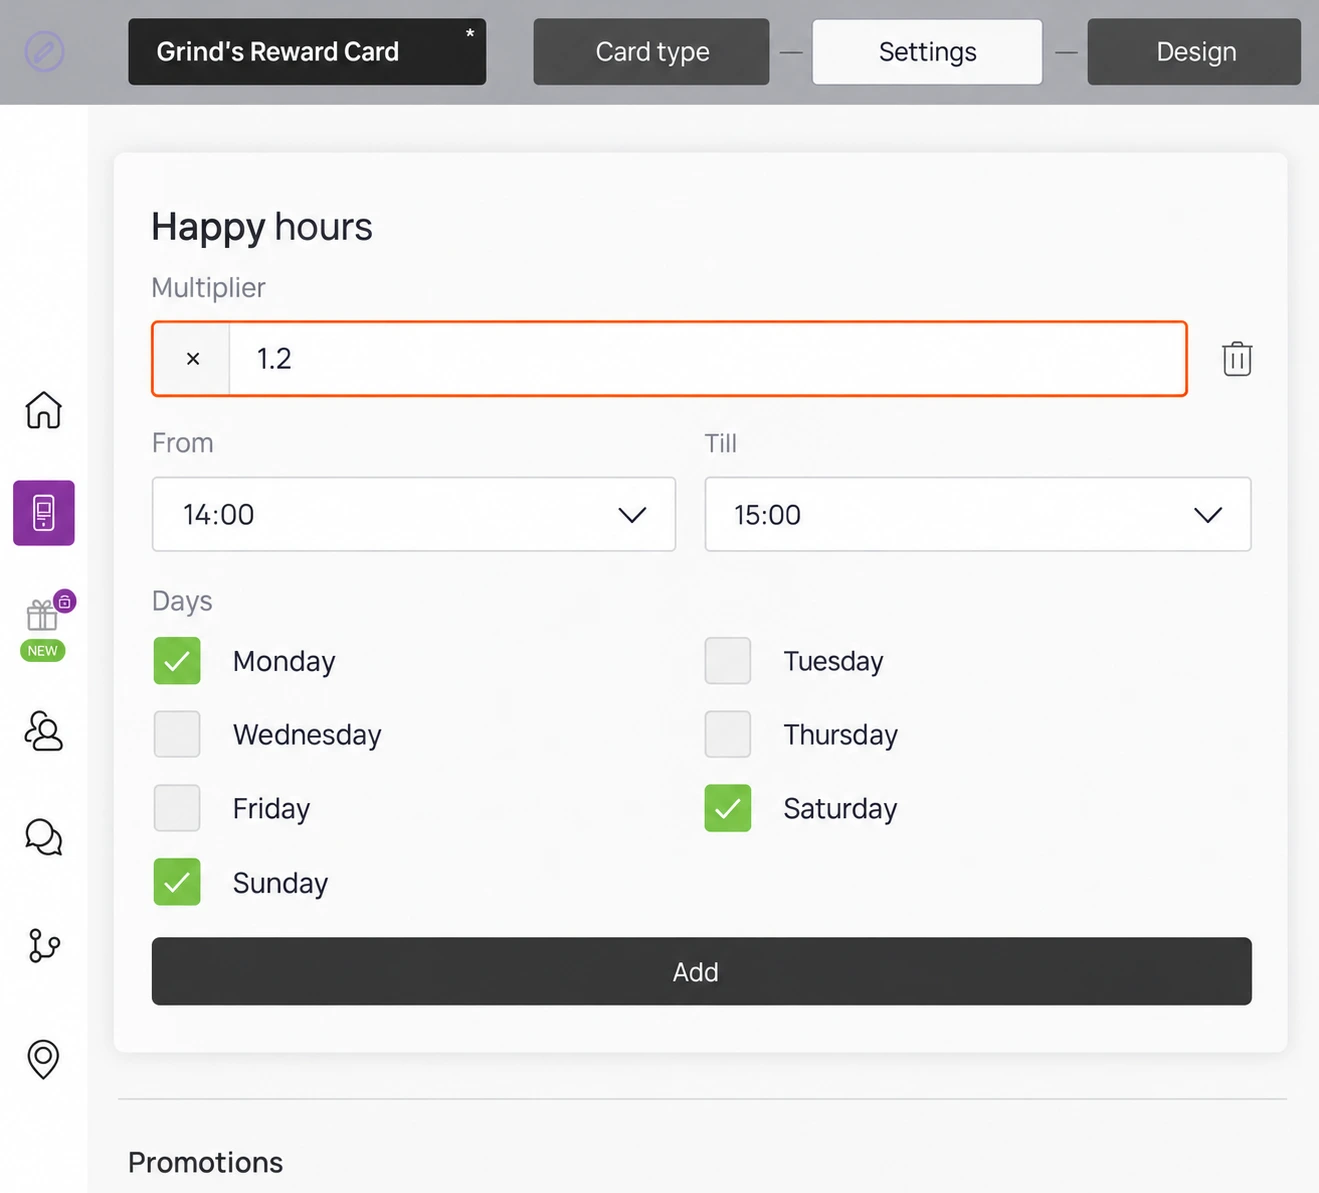
- To offer extra points during selected periods, configure Happy hours: Multiplier, From, Till and the required Days. Use Add for another time rule if needed; review any overlapping rules before launch.
For example, enter
1.2as the multiplier,14:00in From and15:00in Till, then select Monday, Saturday and Sunday. That means 1.2 times the base points, or 20% more. For example, 10 base points become 12 during the qualifying period. Confirm the operating time zone, rounding and interaction with promotions for your own offer. - Promotions is optional. Use its plus control to select a promotion you have prepared. Check its dates, eligibility and effect alongside your reward rules. Give each promotion a clear name and make its conditions easy for staff to explain.
Set expiry, locations and regional formats
- Choose Card expiration date: Unlimited, Fixed term, or Fixed term after card issuing. For a limited offer, complete the date or Term controls that appear. Choose a term that matches your offer; a fixed expiry is not required for every business.
- Set Lifetime points separately. The current choices are Unlimited and Fixed term after bonuses earned. For example, choose 6 Months if you want points to expire six months after they are earned. Card expiry and point expiry are different settings, so state both clearly in your terms.
- Select the participating Locations. Then choose Language, Date format, Thousands Separator and Decimal Separator for your customers and staff.
Choose what staff must enter
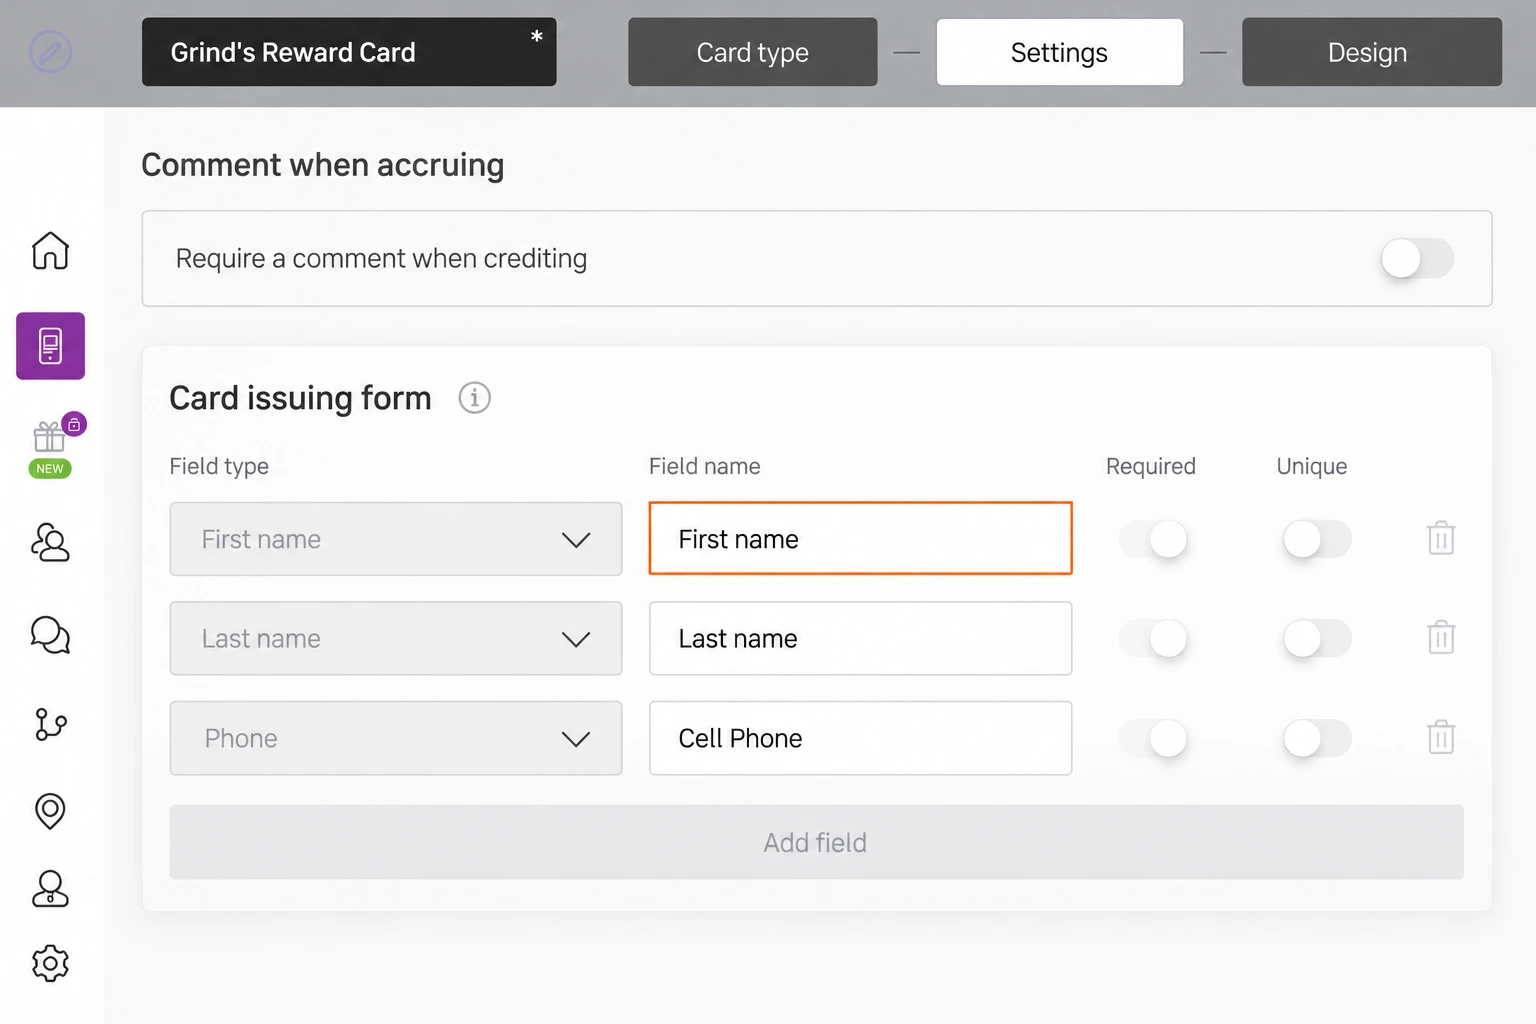
- Under Purchase amount when charging, enable Purchase amount is required in Scanner App if staff must enter a purchase amount. Under Comment when accruing, enable Require a comment when crediting if staff must add a comment. Leave the comment requirement off when you do not need a note for each transaction.
Prepare the customer signup form
- Under Card issuing form, choose each Field type and enter its customer-facing Field name. These fields collect information when a customer gets the loyalty card; they do not create a merchant account.
- Enable Required for fields customers must complete, and Unique where each customer's value must be distinct. Use Add field for another field, or the trash icon to remove an unwanted field. If a control is locked on your card, ask Support about the available options before issuing cards.
- Set Phone mask to the appropriate country format. This helps customers enter their phone number in the correct format.
- Review Privacy policy, Consent to the processing of personal data, and Privacy policy (full text). Set the switches and enter the wording appropriate to your business. Check the resulting customer form before sharing it.
Choose installation access and bonuses
- Decide whether to display the Google Wallet Installation button and PWA Installation button on the install form. PWA provides a web-app installation option. Follow the relevant installation instructions for the customer's device.
- Set Limit the number of cards issued if needed; use 0 - unlimited when you do not want a limit. Review Card installation via shared link. This setting applies only to shared links; customers can still install through an individual link.
- Set Number of points when issuing a card for a welcome bonus and Number of birthday points for a birthday bonus. Use
0if you do not want to offer that bonus. If you offer a birthday bonus, confirm how the required birthday information will be collected. - Decide whether to enable Track visit when redeem reward and Earn points when redeem reward. Leave these off if you do not want a reward claim to count as a visit or earn new points. Make this policy clear to staff.
Optional UTM links and analytics
- Use UTM to create campaign links with their own welcome bonus. Enter a Source name, such as the name of a campaign or acquisition channel. Set any channel-specific Number of points when issuing a card and welcome-point expiry, then use Add a link with a UTM tag. These welcome-point settings take precedence over the card template settings. Review Additional fields if your campaign needs them.
- If your business uses tracking, enter the intended configuration in Analytics and the Pixel ID in Meta Ads. Leave them blank if unused. Check that visits appear in your analytics before relying on reports.
- Select Continue to move to Design.
Design
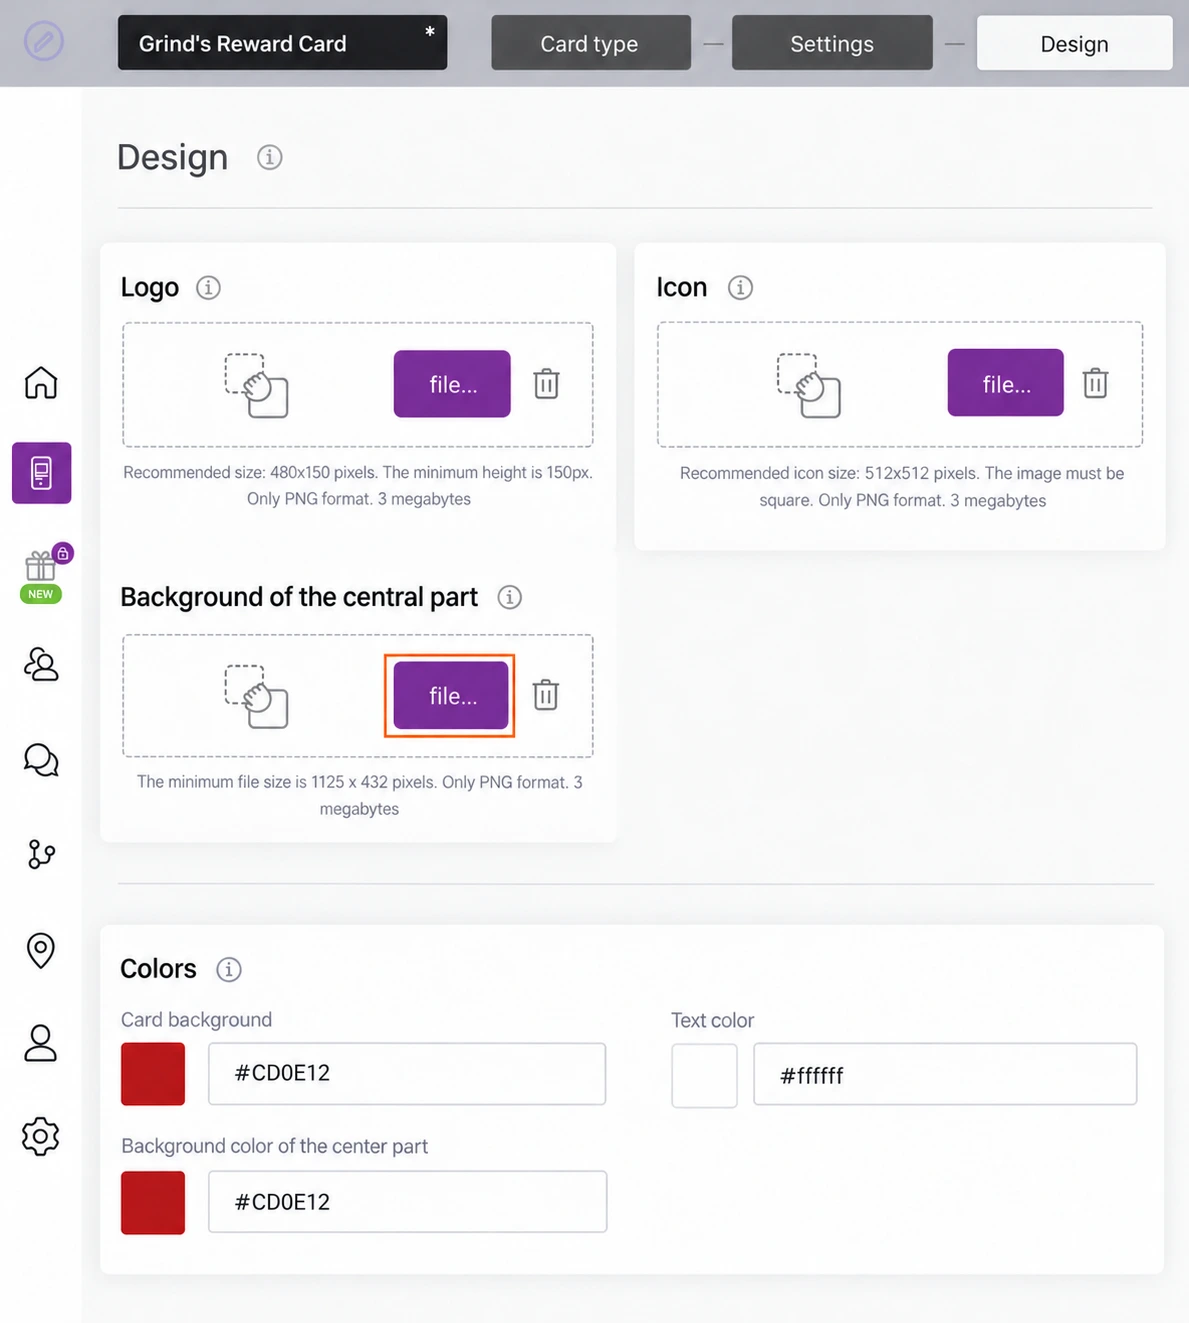
- Upload your Logo, Icon and Background of the central part with their file... controls. The logo appears on the card and can appear on the issuing form; the icon is used for the card's icon/push presentation. The background is the base central artwork, separate from the individual reward-level images.
| Artwork | Image requirements |
|---|---|
| Logo | Recommended 480 × 150 pixels; minimum height 150 pixels |
| Icon | Recommended 512 × 512 pixels; square |
| Background of the central part | Minimum 1125 × 432 pixels |
Use PNG files within the 3 megabytes limit for all three images. Use your own approved artwork and inspect the phone preview for clipping.
- In Colors, set Card background, Text color and Background color of the center part. Check that the text remains easy to read against the artwork.
- Under Fields name, choose what each Field displays and enter its Field name. For example, choose Till the next reward and Reward, and enter
Till the next rewardandRewardsas their names. Check the wording in the phone preview. - Decide whether to enable Show logo at card issuing form and Show background color on card issuing form. Select Continue to open Information.
Information
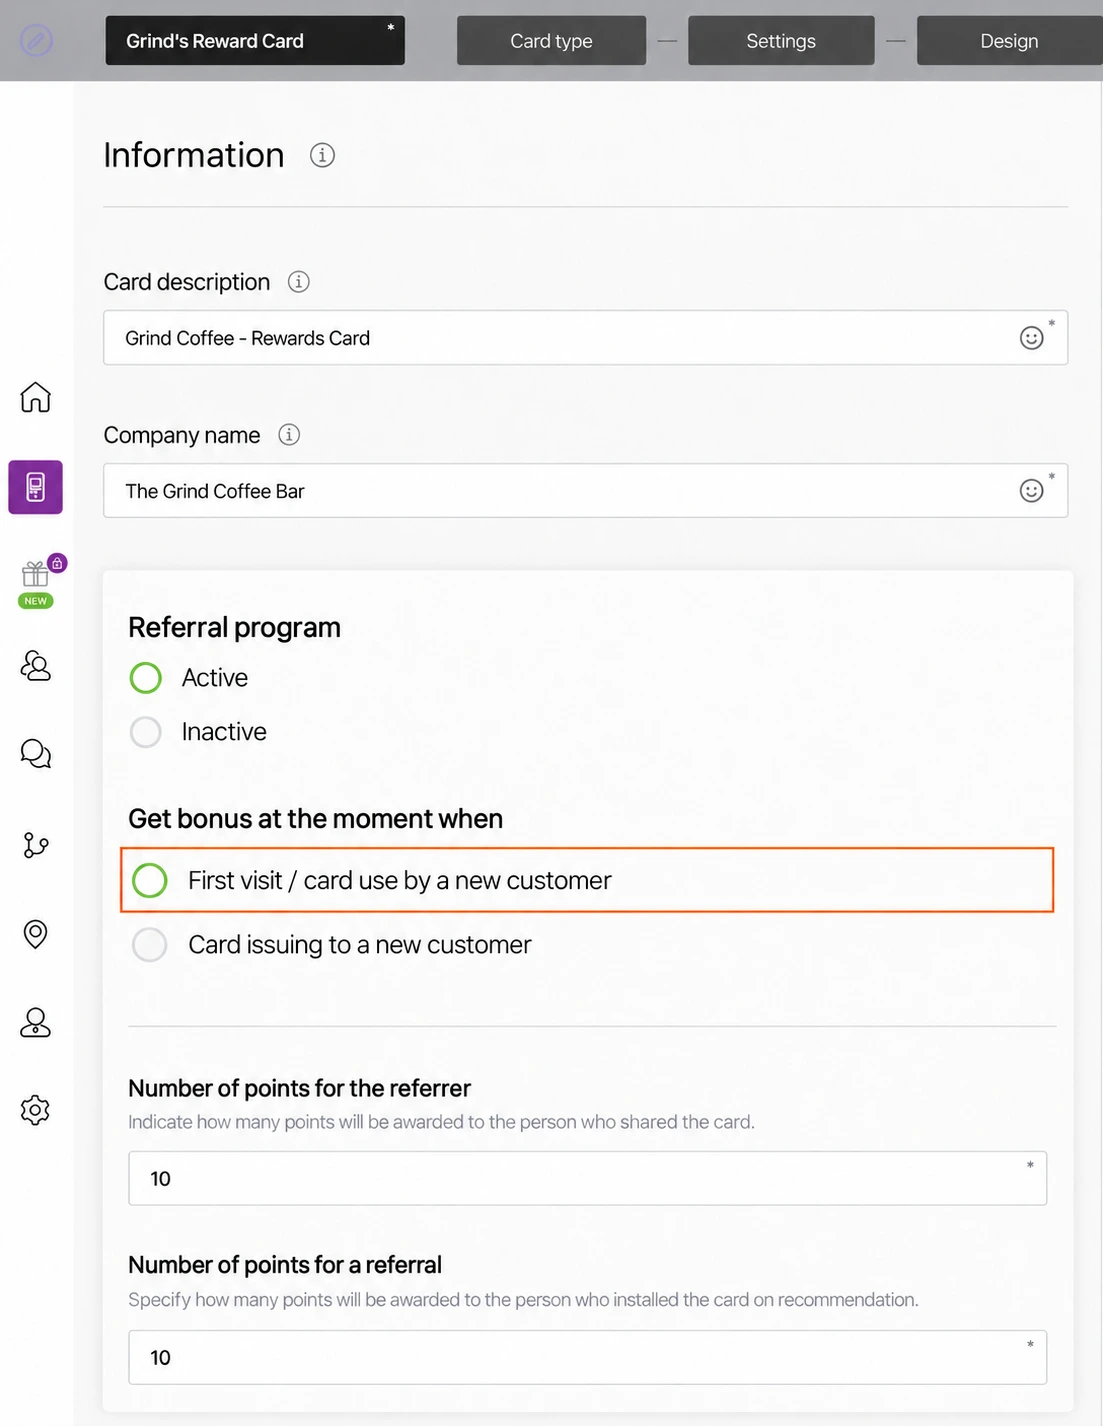
- Enter Card description and Company name. Use a description that helps a customer recognise the offer. Review the back-of-card preview on the right.
- For an optional Referral program, choose Active or Inactive. If active, select Get bonus at the moment when: First visit / card use by a new customer, or Card issuing to a new customer.
- Set Number of points for the referrer for the person who shared the card and Number of points for a referral for the person who installed it. For example, you could give each person 10 points when the new customer first uses the card. Welcome points are configured separately in Settings.
- Under Active links, select Type, enter the destination in Link, and enter the customer-facing Text. Choose URL, Phone, Email or Address as appropriate. Use Add link for another destination and the row's trash icon to remove one. Open each link to check that it reaches the correct page or contact details for your business.
- Feedback links is optional. Use Add link, then complete the type and business-review destination shown. If the control is unavailable, leave this optional feature for later and ask Support. A feedback link does not guarantee a higher rating.
- If needed, enter a Link for redirection after card installation. This applies only to cards installed in Apple Wallet.
- Enable Terms of use when you want to display your terms and enter the agreed earning rule, rewards, exclusions, expiry and redemption conditions. Optionally provide Link to full terms and conditions (optional). Keep these consistent with Settings and the artwork.
- Complete Issuer information with your company name, email and contact number. These details appear on the back of the card. Check the preview for accuracy.
Use the four-level example for ideas on explaining your own offer on the back of the card.
Save & Preview
- Review all four editor sections. Use Save and preview, or Finish at the bottom of Information, when you are ready to save your own card. Check the resulting preview before sharing the card.
- In the preview, inspect the front and back of your card. Use Copy link to copy your card's installation link, or scan its QR code on your own test device. Keep this link for sharing after you have checked the installed card and tested the offer.
- Check the settings named in the activation warning before confirming; some choices will become locked. If activation is still required, use the available Activate or Activate Card control and follow the displayed confirmation. If your card is already Active, you do not need to activate it again. Follow Activate your card if you need help with activation.
- Open your installation link on the intended device and follow Apple Wallet or Google Wallet instructions. Check the installed card's artwork, terms and links, then follow the counter instructions to test earning and claiming with your staff before sharing the card.
If your screen differs, contact Support with the screen name before repeating a save or activation.
Use the card at the counter
These instructions are for staff using Scanner App. The earning steps below use Spend.
Sign in with your manager username (email address) and password. Select Scan and point the camera at the QR code on the customer's loyalty card. The first time you scan, allow camera access if prompted. The Scanner App scans the code and shows the customer's details. To search instead, select Search customers at the bottom of the screen. Asking for their mobile phone number is usually quickest: enter part of it, then check the matching name and card before selecting the customer. You can also search by first name, surname, email address or Reward card serial number. See Find your customer for the search example.
Add points for a purchase
- If your card uses Spend, select Add, enter the eligible purchase amount in Fill in the purchase amount, USD, then select Add points. Enter the purchase value; Scanner App calculates the points using your earning rule.
- On the separate Confirmation screen, check the purchase amount and select Add. A comment is normally optional, and you only need to enter a purchase amount here if your card requires it. Complete required values shown; follow Require a comment when crediting if enabled.
- When Successful operation appears, select Done, then check that the wallet balance updates. Check the points awarded against your earning rule, including how amounts that do not divide evenly are handled.
Claim a reward
- To redeem, open Redeem and select the available named reward.
- On the separate confirmation screen, verify the reward and select Redeem. A comment is normally optional; complete any purchase amount required by your card settings. Check success and the remaining balance before repeating a transaction or handing over another reward.
Before launch, test adding points and claiming a reward with your staff. Check the wallet balance after each action. If the available reward, required input or result differs from your rules, contact Support before repeating the transaction.
Need help?
If anything is unclear, get help or contact our support team.